2009年4月27日 星期一

Embedded Linux EVM Board, also can work as IP Camera, NAS, Printer Server...


Z-NAS
Linux Magic Box -- Support Open WRT


Muti-Function Module Board Learn Embedded Linux quickly

Offer Following Solutions - IP Camera (Recordable), NAS(Network-Attached Storage),54M Wireless, Printer Server ,FTP Server,Web Server ,NTP Client....for developer


Except Development , you can use it as following:

IP Camera:


NAS:


You also can easy add applications as your require.
*Open Wrt provide exceed 500 free application package for you


Now Just Need USD: 149 --one piece F.O.B. Twaiwan
( Module Board + CCD Camera + Wireless + JTAG + All Source Code)


Software(include following Source Code):

Linux : 2.6.24
Bootloader: Ecos2.0
Network: Static IP, Dhcp Client (Dynamic Auto Get IP), PPPoe( ADSL dialed)
IP Camera : Stream MJPEG files over an IP-based network from the webcam to a viewer( up to 960x720 )

Support 802.11g Wireless

Support 3G , 3.5G Wireless

NAS:Samba3.0

Printer Server , FTP Server , Web Server and Support Open WRT

*Open WRT provide exceed 500 free application package for you


Hardware (Provide its Schematic):

CPU: RDC8610 133Mhz CPU with MMU
DRAM: 32M Bytes
Flash: 4M Bytes
USB: High Speed USB2.0 Host *2
USB UVC Camera*1
54M 802.11g Wireless *1
Mini PCI: Slot *1
Network: 100/10 M fast Ethernet *1
RS232 Cable *1
JTAG: JTAG *1
DC-5V Power *1


Contack Us:
Email: tiwang@anet.net.tw MSN:tiwang01@hotmail.com

2009年4月25日 星期六

Introduction and Application


Z-NAS Module:

USB 2.0 *2 Port
Mini PCI Slot
100/10M Fast Ethernet
RS232 Port + JTAG


Support Following USB and Mini-PCI Device Driver


*Linux driver only can support specific device and not for all


After Linux Start up, Plug in above 3G wireless USB Card,
You Can see following from ifconfig command


2009年4月23日 星期四

Order Z-NAS Module Board

Contack Us:

We offer the service about hardware and firmware redesign with extra charge

Email: mailto:ti.wang@msa.hinet.net
MSN:tiwang01@hotmail.com

2009年4月22日 星期三

Configure Z-NAS Network Setting

Before use the function about "IP Camera ; NAS and Printer Server" , you need to configure the IP address setting correctly.

Following methods let you configure the Z-NAS IP address setting


1) Connect Web Server and configure IP setting ( default http://192.168.123.168/ )


2) Connect the RS232 Cable to Z-NAS, and then Run the Hyper Terminal

Under linux console, edit the "/etc/config/network" file
#vi /etc/config/network

*Edit the "/etc/config/network" file to select “Static”,”Dynamic get IP” or”PPPoe ADSL dialed”and set value

3) In MicroSoft Windows, use "My Network Place" to find Z-NAS, and then edit the "/etc/config/network" file

4) Of course, you also can set the IP with the "ifconfig" command under linux console


Default setting:

When you connect the network cable and power on Z-NAS Board. Fist Z-NAS board will work as Dhcp Client to get a IP address from Dhcp Server ,but If it could not find the Dhcp Server ,the Z-NAS will get its default Static IP "192.168.123.253"

2009年4月21日 星期二

Quick Start for IP Camera , NAS-Network Attached Storage


(A)Use Z-NAS as IP Camera

1. Connect the CCD Camera to Z-NAS Module Board

2. To view the stream with browser ( default IP 192.168.123.168)


3. To view the stream use VLC or Firefox and open the URL:
http://ip:8080/?action=stream

ip: xxx.xxx.xxx.xxx the value depend on Z-NAS ip address

VLC download from http://www.videolan.org/vlc/
Firefox download from
http://www.mozilla.com/en-US/


(B) NAS Network Attached Storage – How to use

1. Connect the USB Disk to Z-NAS Module Board

2. To access the USB Storage in Z-NAS under Microsoft Windows .
First, go to "My Network Places" and search "Computer name". Input "Z-NAS" and start to search and you will find the device.

Or Select the"My Network Places" and type the address of "file://E-NAS/"
and press "Enter", then you will find the Storage icon.

2009年4月19日 星期日

Quick start for Printer Server

(1). Connect USB Printer or USB Printer Cable to the Z-NAS usb port


(2). How to use LPR client in Windows XP /Win2000

a.Open Printers and Faxes.

b.Click Create a new port, and then click LPR Port.


c.Click Next and then give the Z-NAS IP(Printer Server) information:


d.Type print queue on that server .Ours is “lp” lowercase letter
And Enable “LPR Byte Counting Enabled”


e.Apply your settings


2009年4月18日 星期六

Quick Start for Developer

(1). Quick Run Linux


A. Connect the RS232 Cable from the COM port of "Windows host" to the "Z-NAS Module board"

Use the settings shown in follow on the COM port which is to connect with the target.

COM port settings 38400 8-N-1

Baud rate 38400 bps
Data bits 8 bit
Parity None
Stop bit 1
Flow control None


B. Connect the DC-5V Power cable to Z-NAS Module board

After Steps A and B , Now You should see "Linux Start Up" on your Hyper Terminal
As following:


2009年4月16日 星期四

Linux Build and Development Steps

System Requirements

2-3Ghz Linux PC (used for builds of embedded Linux images)
512MB Ram or more
10 GB of HDD space
Fedora 10 Linux (install ALL packages)

(1) Make Linux and Root File system

Tools and Source Installation

Extract source files on your hard disk (uncompress the sources on your hard disk).

login as user

cd ~
cp linux-znas001.tar.gz ~
tar -xzf ./linux-znas100.tar.gz

cd ./kamikaze

make V=99

After all you can find the Linux Image "openwrt-rdc-jffs2-64k-znas.img" in ( kernel + root file system)

~/kamikaze/bin


Place the Linux Image file in /tftpboot directory


(2) Make Redboot(BIOS)

Ecos 2.0 is our BIOS , all of the source code be packaged as a file-"redboot-znas001.tar.gz" in CD

login as root

cd ~
cp redboot-znas001.tar.gz ~
tar -xzf ./redboot-znas100.tar.gz

cd ~/tmp/ecos/redboot

# set PATH for find the cross compile tools (i386-elf)
PATH=~/tmp/ecos/ecos-2.0/tools/bin:$PATH ; export PATH
PATH=~/tmp/gnutools/bin:$PATH ; export PATH

make clean ; make

After all you can get the "BIOS" redboot.bin in
~/tmp/ecos/redboot/install/bin/redboot.bin

Place the redboot.bin file in /tftpboot directory

2009年4月14日 星期二

Load "Linux" and "BIOS" into the flash of Z-NAS Board

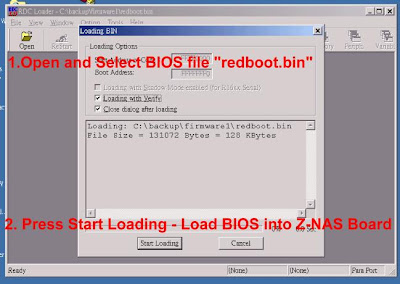
(1) Load "BIOS" into Z-NAS Board

A. Connect the JTAG Cable from the printer port of Windows host to the Z-NAS Module board

B. you can find images about redboot.bin(BIOS) and Linux image in the /images directory Of CD

C. Install the software "RDCLoader" to the Windows Host PC, and then

1. Select from program folder "RDC Loader" or double click on the desktop.
2. Select from menu "File/Open" or toolbar "Open" to start loading.
3. Select BIN file type and filename to load. Click Open to continue.
4. Click "Start Loading" to start loading to flash


(2). Load "Linux" into the flash of Z-NAS Module Board

A. Start the TFTP Server and place the "Linux" image file inthe "\tftpboot" directory
( if you use tftpd32 for windows, place the "Linux" file in the same
directory as tftpd32 program)

tftpd32 download from http://tftpd32.jounin.net/

B. Connect Ethernet Cable to LAN and the RS232 Cable to Z-NAS board .

C. Run Hyper terminal.

D. Power on the Z-NAS Module Board and then press "CTRL-C" two key in the Hyper terminal program. Now you can go into the Redboot Console.


E. Before load "Linux" into Z-NAS Board, you must setup the correct IP address for Z-NAS board and tftpd Server in RedBoot

Example as: the Z-NAS default IP is 192.168.123.254 and if your Tftpd Server
IP is 192.168.123.1 , Now you should RUN following command under Redboot Console for setting IP
RedBoot>ip_address –l 192.168.123.254 –h 192.168.123.1

E. Load the "Linux" into the ram of Z-NAS board through network

RedBoot>load -r -v -m tftp -h 192.168.123.1 -b 0x400000 image.bin

F. Load from ram into flash

RedBoot> flash -s 0x400000 -d 0xffc00000 -l 0x3e0000


G. Restart the Z-NAS Board, You can see


2009年4月2日 星期四